This may sound ridiculous, coming from a vegan, but I'm losing my interest in grains. It's not that I don't like the taste or the texture, it's that I don't like how they make me feel. Even gluten free grains, although not as harsh on my stomach, give me this uncomfortable airy feeling if I eat too much of them.
I've had digestive issues for the past couple years and I've never had the time to really let my system relax and figure out what foods I'm sensitive to (if any). So now that I have a free summer, where I don't have to run for school or stress myself out with tons of work, I'm experimenting. It's been less than a week, but I've been avoiding soy, gluten, peanuts, and most grains, with the exception of nama shoyu(soy and wheat) and miso(soy). Both are fermented and much more easily digestible than they would be normally. So guess what? No bloating. Minimal discomfort. I hope i'm not jinxing myself, because for the past couple days I've felt pretty damn good.
So, what have I been eating? I have Ani Phyo's Raw Food Essentials to thank. I've been eating pancakes, crepes, sandwiches on awesome flatbreads. And, the reason for the post, my own raw cashew yogurt.
August 9, 2011
After a Long Hiatus...
I haven't posted in a while! I thought I would post more when school ended (thank god) because I would have more free time, but while I was in the kitchen a lot more, I didn't feel I was creating anything that was my own. I was using a lot of other people's recipes- check out the recipe I used to make zucchini muffins. Soo good.
However how I'm looking back and realizing there have been some things that I've created and evolved enough to call my own that I'd like to share.
1.) Is the most simple way to have a nutrient packed breakfast. Or snack. Or dessert.
Chia Pudding
You will need
3 tbs chia seeds
3/4 cup unsweetened almond milk (any flavor)
1 tbs cinnamon
3-6 drops of liquid vanilla stevia
Mix all of the ingredients together either the night before or at least half an hour before you were planning to eat it. Don't use sweetened almond milk, because sugar sucks. Although if you do, at least the cinnamon will help your blood sugar levels : )
You might want to mix the pudding a couple of times because sometimes the chia seeds will sort of clump together and won't absorb all of the milk.
Mix in raisins, cacao nibs, banana, peaches, berries, nuts, or whatever else you can think of to add. Enjoy!
May 3, 2011
Raw Post-Run Pudding
Spring is here! The weather is warm, hot tea has turned to iced tea, and I no longer feel the need to wrap myself in a scarf and long coat before venturing outside. I absolutely love warm weather, and everything associated with it.
I've been trying to get back into running. The cold weather mixed with quitting track and getting a part time job on top of my grades had just about soaked up every ounce of desire I had to hit the trails. I've also been trying to eat more healthy. More fruits and veggies, less heavy cooked and processed foods. So far so good, I've been enjoying lots of fresh juices and smoothies every day, as well as doing more yoga and getting more runs in.
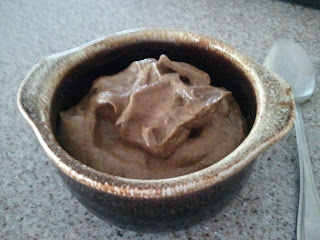
So, where is the damn recipe? A long run generally leaves me willing to eat anything in sight. I usually try to get some protein, because my diet is probably not very high in it, as well as some good fats and carbs. You know, a good balance. On the way home I usually brain storm in my head exactly what I want to eat, so that I don't eat the entire kitchen when I get home. A vamped up version of the classic banana-avocado-cacao pudding, this is loaded with the good stuff.
Raw Post-Run Pudding
makes a pretty big portion
1/2 avocado
1 frozen banana
1 ripe banana
1 tbls cacao powder
1/3 tsp cinnamon
1-2 tbls hemp protein powder
1 tsp almond butter
a teeny dash of sea salt
1.) Blend the avocado and frozen banana in a food processor.
2.) When the mixture is smooth, add the ripe banana.
3.) Add everything else and blend well.
4.) Feel free to top with bee pollen, granola, coconut, or just eat as is!
April 21, 2011
Digestive Tea
If you have your own slew of digestive issues, you're probably always looking for natural digestive aids. Or you could just want something after a heavy meal. Either way, herbal teas can really help. This one is an easy blend of herbs and spices that you could probably find in your spice drawer.
Digestive Tea
1/2 inch piece of ginger root
1/2 tsp coriander seeds
1 cardamom pod (or about 1/2 tsp cardamom seeds)
1 tsp fennel seeds
1/4 tsp ground cinnamon
1 dash of tumeric
1.) Peel the ginger root and slice it very thinly.
2.) Take a wide blade and smack the pieces of ginger on a cutting board, as if you're trying to flatten them. Do this until they break or squish a little bit.
3.) Break open the cardamom pod and get the seeds out, then "squish" the seeds with the flat edge of your knife. Do this again with the fennel and coriander. If you have a mortar and pestel, you could probably use that.
4.) Boil water. Put all of the ingredients in a loose tea bag, or in a tea strainer.
5.) Seep the blend in a mug full of boiling water, and let it seep for at least 5-10 minutes.
6.) If you prefer sweet tea, feel free to add a sweetener.
7.) Sip and heal.
April 19, 2011
Odds and Ends
I haven't posted in forever! Mainly because I've been swamped in school work. On the upside, this week is spring break, which means I have a whole week to cook whatever I want! When I'm not working or studying for AP tests, that is. Also, I've completed a ten piece art portfolio for one of my classes, focused around the theme of the balance and harmony of veganism.
I haven't been doing a lot of cooking, because my schedule hasn't allowed it, there are a few things I've made here and there.
One thing I've been craving a LOT of lately is seaweed. I don't know if my body is in need of some minerals, but I'm wanting it all the time. I've had seaweed salad at restaurants a couple times, and I'm assuming they use kelp noodles. Since I don't feel like ordering kelp noodles off of the internet, I just used arame.
Seaweed Salad
makes one serving
1/3 cup dry arame, soaked for at least ten mintues or until it's tender
1 tbls toasted sesame oil
1/2-1 tsp nama shoyu, or soy sauce
1/2 tsp rice vinegar
sesame seeds
avocado
While the arame is soaking, mix the sesame oil, shoyu, and rice vinegar.
Toss the arame with the dressing.
Top with sesame seeds and a quarter of an avocado.
Enjoy! It's very easy and very yummy.
Dandy-Blend Drink
If you haven't heard of Dandy-Blend, it's a nice caffiene-free alternative to coffee. It doesn't taste exactly like coffee, but the roasted roots they use gives it a similar feel. I need to jazz it up a bit if I'm making it to replace my usual coffee buzz, but it's good stuff. And dandelion is great for you!
For a mug full:
1 slightly heaping tbls of Dandy-Blend
1/4 tsp cinnamon
hot water
chocolate hemp milk
plain rice milk
Pour as much hot water as you normally would for a mug of coffee into the mug.
Put in the Dandy-Blend and the cinnamon and mix.
Fill the mug about 1/4 inch higher with chocolate hemp milk, then fill the rest of the mug up with rice milk as you normally would.
What you get is a slightly chocolately, spiced herbal drink that's pretty tasty.
March 5, 2011
Wheat Grass!
After my wonderful buckwheat crop, I started using my trays for what i originally bought them for, growing wheat grass! I followed the Sprout People's instructions and sprouted my wheat berries in a jar, then planted them in my tray with organic potting soil and a little bit of my compost, watered them every day, put them out in the sun, and watched them grow! It was honestly really easy. Completely organic, and very inexpensive! I got a little manual wheat grass juicer online which is a big hunk of metal, but gets the job done, and really isn't that difficult to clean. (You have to take every single piece apart, but that's typical with juicers, so I wouldn't consider it too much work.)
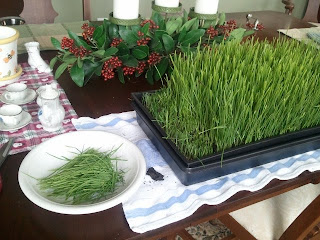

Living greens to green juice within minutes!
I juiced some of my crop for the first time today and got what was probably an ounce of juice. I washed it down with some fresh apple juice because I didn't really enjoy the minty/grassy taste, and although I don't think I'll ever like it, I think I could grow to not dislike it.
Wheatgrass juice is a good food source of vitamins, minerals, chlorophyll, and an overall health tonic. It's awesome stuff, and it's even better when you've grown it yourself.
Living greens to green juice within minutes!
Adzuki Red Pepper Bean Dip
Amidst the stresses of keeping up my grades and deciding what college I am going to next year, I am somehow finding time to make various odds and ends to keep me going through the week. Cafeteria food is obviously not an option, so even when I'm really busy, I still need to find time to cook a bit. I don't mind this at all, however. I love to cook, and it definately relaxes me. I love nothing more than being in the kitchen, combining new flavors and ingredients, and seeing what I get.
I'm always needing quick little servings of dips to bring in containers and eat with veggies or crackers. I have been making a lot of nut based dips, but despite the fact that I soak them and ferment them a little bit they still feel too heavy for me sometimes. And I've also been craving more cooked, comfort foods lately, so that's what I've been making.
I have a pretty large amount of beans in bulk sitting at the bottom of my pantry that are rarely used, so I decided to pull a couple out and soak them for the day and make a dip from scratch. Hummus would have been easy, but I like very garlicky hummus and I don't like bringing garlicky things to school because they are always recieved by my peers with wrinkled noses and skeptical comments. So I was going for a dip that was well seasoned but not stinky. It turned out to have an indian food undertone, due to the spices I happened to choose. It's not very strong and could be a bit more salty, but I'm really not a salt person, so add more if you'd prefer. If you do happen to have a nut cheese on hand, such as a tangy cashew-sunflower seed-red pepper cheese, it would go wonderfully as a layered dip for veggies or crackers, or slathered on some bread with green for a nice sandwich.
The choice of beans really doesn't matter. You could use whatever you wanted, the adzuki and white beans are just the ones that interested me.
Adzuki Bean Dip
3/4 cup dried adzuki beans
3/4 cup dried white beans
1 slightly heaping tsp dulse flakes*
1/2 tsp tumeric
1 tbls olive oil
1 red pepper
1 tbls tahini
1/3 tsp salt
1 tsp cumin
1/3 tsp smoked paprika
dash of ground mustard seed
dash of black pepper
*Dulse is a seaweed, and you can buy it whole or in flake form. The flakes are nice because they require no soaking- you can sprinkle them on salads or add them into recipes as is.
1) Soak the beans for eight hours, or over night.
2) Drain the beans and cook them in water for 45minutes-1hour, or when they are soft. When you cook them, add the dulse and half of the tumeric, for digestion.
3) Slice the red pepper into strips and broil it for about 20 minutes (I did this in the toaster oven). You can broil it for longer, but I decided to stop here because I wasn't going for the totally cooked kind that you find in a jar.
4) Put all of the beans in a food processor and mix. Add the olive oil and tahini and mix some more. Add the red pepper, mix. If your processor has a hard time processing the red pepper as mine did, just take half of the beans and pepper mixture out and process the smaller batch, then slowly add more and more and continue processing. Add the rest of the spices, mix, taste, add some more, mix, taste, and enjoy!
Sunflower seed cheese
1/2 cup cashews
3/4 cup sunflower seeds
1/2 red pepper
smoked paprika
chili powder
juice of 1 lemon
sea salt
2 tsp nutritional yeast
1 probiotic capsule
1) Soak the cashews and sunflower seeds overnight.
2) Blend them in the food processor, then add the pepper, lemon juice, nut yeast and spices, and blend some more.
3) Open the probiotic capsule and try not to spill it all over yourself in the process.
4) Pour in the contents and mix everything really well.
5) Put it on a cheese cloth on top of a small bowl, like the herbed cashew cheese, and put it in the dehydrator at 110 degrees overnight (or just let it sit out in a warm spot). Turn off the dehydrator the next morning and forget to take it out until that night, and you will have yourself some tangy fermented cheese!
I'm always needing quick little servings of dips to bring in containers and eat with veggies or crackers. I have been making a lot of nut based dips, but despite the fact that I soak them and ferment them a little bit they still feel too heavy for me sometimes. And I've also been craving more cooked, comfort foods lately, so that's what I've been making.
I have a pretty large amount of beans in bulk sitting at the bottom of my pantry that are rarely used, so I decided to pull a couple out and soak them for the day and make a dip from scratch. Hummus would have been easy, but I like very garlicky hummus and I don't like bringing garlicky things to school because they are always recieved by my peers with wrinkled noses and skeptical comments. So I was going for a dip that was well seasoned but not stinky. It turned out to have an indian food undertone, due to the spices I happened to choose. It's not very strong and could be a bit more salty, but I'm really not a salt person, so add more if you'd prefer. If you do happen to have a nut cheese on hand, such as a tangy cashew-sunflower seed-red pepper cheese, it would go wonderfully as a layered dip for veggies or crackers, or slathered on some bread with green for a nice sandwich.
The choice of beans really doesn't matter. You could use whatever you wanted, the adzuki and white beans are just the ones that interested me.
Adzuki Bean Dip
3/4 cup dried adzuki beans
3/4 cup dried white beans
1 slightly heaping tsp dulse flakes*
1/2 tsp tumeric
1 tbls olive oil
1 red pepper
1 tbls tahini
1/3 tsp salt
1 tsp cumin
1/3 tsp smoked paprika
dash of ground mustard seed
dash of black pepper
*Dulse is a seaweed, and you can buy it whole or in flake form. The flakes are nice because they require no soaking- you can sprinkle them on salads or add them into recipes as is.
1) Soak the beans for eight hours, or over night.
2) Drain the beans and cook them in water for 45minutes-1hour, or when they are soft. When you cook them, add the dulse and half of the tumeric, for digestion.
3) Slice the red pepper into strips and broil it for about 20 minutes (I did this in the toaster oven). You can broil it for longer, but I decided to stop here because I wasn't going for the totally cooked kind that you find in a jar.
4) Put all of the beans in a food processor and mix. Add the olive oil and tahini and mix some more. Add the red pepper, mix. If your processor has a hard time processing the red pepper as mine did, just take half of the beans and pepper mixture out and process the smaller batch, then slowly add more and more and continue processing. Add the rest of the spices, mix, taste, add some more, mix, taste, and enjoy!

It doesn't look like the prettiest thing, but it tastes good!
Also, if you are interested in the tangy cashew-sunflower seed-red pepper cheese, I don't have measurements, because it was the result of a dressing for kale chips that I did not have enough kale for, and a lot of it was adding and adding until I got something I liked. But here is the rough layout:
Sunflower seed cheese
1/2 cup cashews
3/4 cup sunflower seeds
1/2 red pepper
smoked paprika
chili powder
juice of 1 lemon
sea salt
2 tsp nutritional yeast
1 probiotic capsule
1) Soak the cashews and sunflower seeds overnight.
2) Blend them in the food processor, then add the pepper, lemon juice, nut yeast and spices, and blend some more.
3) Open the probiotic capsule and try not to spill it all over yourself in the process.
4) Pour in the contents and mix everything really well.
5) Put it on a cheese cloth on top of a small bowl, like the herbed cashew cheese, and put it in the dehydrator at 110 degrees overnight (or just let it sit out in a warm spot). Turn off the dehydrator the next morning and forget to take it out until that night, and you will have yourself some tangy fermented cheese!
February 20, 2011
Alternative Education
If you're like me, you'll often find yourself neglecting homework for your calc/chem/etc. class late at night to instead watch food documentaries on YouTube in eight parts, justifying yourself by saying that it's just another form of education, and is equally as important. We could go back and forth about which is more important all day, and I'm definately not encouraging anyone to neglect their homework to sit in front of a computer screen for an hour or so, but if you have the time and you're interested, I would definately recommend watching these, they are the best I've found.
Food Matters
You are what you eat, and food does matter
The Beautiful Truth - This is in parts, all of which are on YouTube
All about Gerson Therapy, and how food can heal
Food Inc.
The unfortunate truth about food production in the U.S.
Food Matters
You are what you eat, and food does matter
The Beautiful Truth - This is in parts, all of which are on YouTube
All about Gerson Therapy, and how food can heal
Food Inc.
The unfortunate truth about food production in the U.S.
What To Do When You Have Loads of Buckwheat Lettuce
My trays of buckwheat generously gave me another full crop! The two crops combined are quite a lot of greens for one person to eat (my parents aren't very interested). So, what then do I do with all of these greens? Find as many different ways to consume them as possible.
1.) Make a sandwich: Toast some Ezekiel bread (or any other whole grain bread). While the bread is toasting mix together cashew butter, miso, and stone ground mustard, in a 3:2:1 ratio. The food processor works best for this, and you're going to want to make extra, if you want to make a killer salad dressing with it later. Spread the cashew-miso mixture pretty thickly on both sides, and then layer buckwheat lettuce, kale, and sliced tomato on one of the pieces of toast. Put the other piece of toast on top and you have yourself a huge messy sandwich!
2.) Make a salad: This makes a HUGE salad. Just warning you.
lots of buckwheat greens
a small handful of sunflower seeds
nutritional yeast
leftover cashew-miso-mustard dressing
1 tbls olive oil
1 tbls apple cider vinegar
1/4 avocado
1 large carrot, shredded
Put greens, avocado, as much nutritional yeast as you would like, and about 1/3 of the shredded carrot, and sunflower seeds in a large bowl.
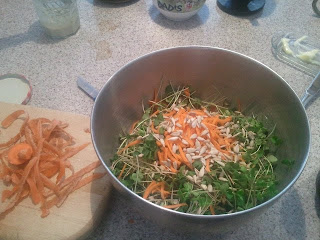
Wisk leftover dressing (there was a bit less than 1/4 cup left) with olive oil and apple cider vinegar. Pour the dressing onto the greens and other things in the large bowl, and mix well.
Put the contents of the bowl on a plate, and put a handful of the shredded carrot on top of the salad, to make it look pretty. Then dust with nutritional yeast.
Give the leftover carrot to your dog, so that he can get some beta carotene. Or save it for yourself.
*I didn't add any, but I think that some powdered or fresh ginger would really accent this salad.
Look at him, just waiting for our picnic outside!

The finished product. Accented by my dad's pink post-it notes.
And now off to start that term paper...the one that's due in two days.
February 15, 2011
Microgreens: Buckwheat!
I've been growing and eating sprouts for a while. When I say a while I mean no more than two years, (I'm an eighteen year old, we think six months relationships are "long term") but nonetheless I've grown them enough to be familiar with them. Different flavors, textures, which are better cooked, better raw, which should never have been sprouted in the first place.
I go off and on sprout kicks, generally just motivated by what I'm craving. Lately I've been craving lots of raw, unadulterated foods. What can I say? They make me feel good. And they're much better of my sensitive digestive system than ToFurky or some gluttonous pasta. Enter buckwheat, which really just wanted to be granola. My work didn't have any hulled buckwheat groats, (the kind that doesn't have the hard, indigestible outershell) So I opted for the unhulled buckwheat, assuming that just like alfalfa, the hull would fall off during the sprouting process. Let me tell you, buckwheat is NOT like alfalfa. You think I would have done my research via SproutPeople, but I didn't. Turns out, unhulled buckwheat is used strictly for buckwheat lettuce, which is grown via growing trays, quite similarly to how wheatgrass is grown. That is , you sprout the grain in a jar, and then put the sprouts in soil and water them and they grow. So I had this buckwheat sprouting in a jar, still in its indigestible hulls, while the growing trays I ordered for my future wheatgrass was still in the mail. What's a girl to do? I put the buckwheat in the fridge, hoping it wouldn't die, and patiently waited until my trays came. When they did, I planted them, and hoped for the best. What a happy accident!
I go off and on sprout kicks, generally just motivated by what I'm craving. Lately I've been craving lots of raw, unadulterated foods. What can I say? They make me feel good. And they're much better of my sensitive digestive system than ToFurky or some gluttonous pasta. Enter buckwheat, which really just wanted to be granola. My work didn't have any hulled buckwheat groats, (the kind that doesn't have the hard, indigestible outershell) So I opted for the unhulled buckwheat, assuming that just like alfalfa, the hull would fall off during the sprouting process. Let me tell you, buckwheat is NOT like alfalfa. You think I would have done my research via SproutPeople, but I didn't. Turns out, unhulled buckwheat is used strictly for buckwheat lettuce, which is grown via growing trays, quite similarly to how wheatgrass is grown. That is , you sprout the grain in a jar, and then put the sprouts in soil and water them and they grow. So I had this buckwheat sprouting in a jar, still in its indigestible hulls, while the growing trays I ordered for my future wheatgrass was still in the mail. What's a girl to do? I put the buckwheat in the fridge, hoping it wouldn't die, and patiently waited until my trays came. When they did, I planted them, and hoped for the best. What a happy accident!

After two or three days. The little guys are popping up!

Right before the slaughter. They look like clover and have a subtle lemony taste.
So now I have a big bag of buckwheat lettuce sitting in my fridge, with a second crop (from the same tray) almost ready. They grow really fast, and they're a very inexpensive way to get some organic greens!
After this I'm going to be trying wheatgrass, which was the initial reason for buying the trays.
I've also tried making raw wheat bread, but (surprise) it has a very raw taste to it. Which is not necessarily what I'm going for. I love my Ezekiel bread, but it'd be nice to find something homemade that's less expensive and just as, if not more nutritionally satisfying. The batch I made was very standard: sprouted wheat berries, ground flax, sea salt, raw honey. I'll be experimenting with a cinnamon-raisin bread and an herbed bread. But for now, enjoy the greens!
January 31, 2011
Herbed Raw Cashew "Cheese"
It looks like we may be having our second major snow storm of the new year, which may mean two consecutive weeks of multiple snow days. I really can't complain. I don't really mind all of the shoveling, and the set back of graduating a couple days later to make up for the lost days doesn't really bother me. I probably should be using the extra days off to get more studying done, May will be here before I know it, laughing at me as I sit in a room for 4 hours taking AP tests, while she's shining her sun and warming the earth. But instead of studying, what do I do? I take time to prepare food I wouldn't have time to make during the school day. I think up little snacks that I would love to have. (Like the one I thought of today during Philosophy class: chocolate cashew butter. It would be sooo easy. And so good.) Sundays are also spent making foods for me to eat during the week. Dips and pates are the easiest, because I love munching on veggies during the day and salads aren't very ideal to be taken out in the middle of class. Some celery, or peppers, with a nice nut or bean dip, and no one even notices.
I've been experimenting with nut "cheeses" a bit lately, trying to ferment them to get that tangy cheese taste. The fermenting hasn't been too successful. I'm going to try adding more miso, and if that doesn't work then just breaking open a probiotic and adding that. So the cheese I made is not notably tangy, but it is still very good. The consistency is very smooth, and the olive oil-rosemary combination gives it a creamy herby flavor.
If you left this out for say, a couple days, it may legitimately ferment, but to be honest I wanted some good dip, and I didn't feel like waiting.
Herbed Raw Cashew "Cheese"
2 cups raw cashews
1 cup raw walnuts
1 tbls extra virgin olive oil
3/4 tsp thyme
1 tsp rosemary
1/4 tsp garlic powder
1 tsp salt
1 tsp miso paste
1.) Soak cashews and walnuts for at least 2 hours, or over night.
2.) Drain nuts. Puree them in your food processor until crumbly.
3.) Add the rest of the ingredients and blend until the mixture is very smooth, like a creamy nut butter.
4.) Put a cheesecloth over a small bowl, and then put the cheese mixture on top of the cheesecloth. Then put plastic wrap over the cheese mixture to keep it from drying out. I used a rubber band to hold the cheese cloth onto the bowl like a cover. The weight from the nut cheese will sink it down a bit.
5.) Let the "cheese" sit like this for 24 hours (or more) in a warm place.
6.) Put the cheese on a plate and enjoy with veggies, chips, crackers, in sandwiches, or whatever else suits you.
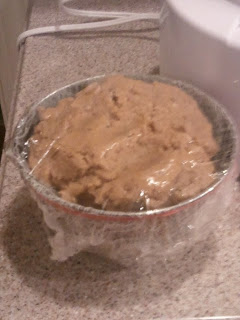 On cheesecloth, covered with plastic wrap.
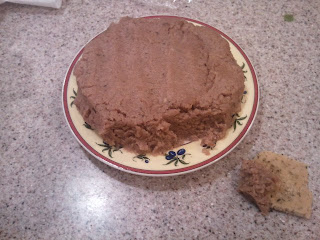 Being enjoyed with Mom's homemade brown rice crackers.
I've been experimenting with nut "cheeses" a bit lately, trying to ferment them to get that tangy cheese taste. The fermenting hasn't been too successful. I'm going to try adding more miso, and if that doesn't work then just breaking open a probiotic and adding that. So the cheese I made is not notably tangy, but it is still very good. The consistency is very smooth, and the olive oil-rosemary combination gives it a creamy herby flavor.
If you left this out for say, a couple days, it may legitimately ferment, but to be honest I wanted some good dip, and I didn't feel like waiting.
Herbed Raw Cashew "Cheese"
2 cups raw cashews
1 cup raw walnuts
1 tbls extra virgin olive oil
3/4 tsp thyme
1 tsp rosemary
1/4 tsp garlic powder
1 tsp salt
1 tsp miso paste
1.) Soak cashews and walnuts for at least 2 hours, or over night.
2.) Drain nuts. Puree them in your food processor until crumbly.
3.) Add the rest of the ingredients and blend until the mixture is very smooth, like a creamy nut butter.
4.) Put a cheesecloth over a small bowl, and then put the cheese mixture on top of the cheesecloth. Then put plastic wrap over the cheese mixture to keep it from drying out. I used a rubber band to hold the cheese cloth onto the bowl like a cover. The weight from the nut cheese will sink it down a bit.
5.) Let the "cheese" sit like this for 24 hours (or more) in a warm place.
6.) Put the cheese on a plate and enjoy with veggies, chips, crackers, in sandwiches, or whatever else suits you.
On cheesecloth, covered with plastic wrap. Being enjoyed with Mom's homemade brown rice crackers.
January 24, 2011
Rawish Chocolate. Kind of.
Most teenagers go to the mall and go on shopping sprees. I go shopping at work (a natural foods store) and to the occasional Whole Foods, where I generally buy things that I don't need with money that I shouldn't be spending. For example, the excessive amount of chapsticks that I bought on my most recent visit. Hey, it's the winter, okay? We all need a little bit extra chapstick. I also had to buy the burdock root I found, even though I have no idea how to consume it. Do I make tea? Would I have to dry it first? Can I just pan fry it and eat it? Who knows. I'll find out eventually, I promise. Maybe I'll post it. A few other first time purchases were cacao beans and maca powder. You can never get enough super foods. And while I don't have any cocoa butter, I do have a 3.5 lb tub of coconut oil, which I can probably sub in while I experiment with a rawish cacao bar, which I don't think I can accurately call chocolate because of the lack of cocoa butter. It doesn't taste like the Green & Blacks chocolate I buy when I have a craving, but then again it is primarily raw, so I wouldn't expect it to. It was my first try, but I would definately make this again. And it would be a great base if I wanted to add anything extra. Cacao bar with goji berries, anyone? This is what I think about instead of paying attention in calc class.
Cacao Bars
makes 16 little squares
1/2 cup raw cashews
3/4 cup ground cacao beans
3 tbls maca powder
3 tbls raw honey
2 tbls coconut oil
1 tbls cocoa powder
1.) Grind cacao beans in a coffee grinder so that you have 3/4 cup of powder (you could of course just use raw cacao powder, but why be simple?)
2.) Put all of the ingredients in a food processor and mix until the cashews are just little specks of white.
3.) Taste. Add more honey, oil or cacao if desired.
4.) Put mixture into pan and press down until the mass is very thin, like a chocolate bar. I would recommend using a smaller pan so that the edges of the pan shape the sides of the mass and you don't just have a giant blob. Unless you want a giant blob.
5.) Put in freezer for about 15 minutes, then take out and cut into 16 squares. Store in fridge and enjoy!
Chocolate Coffee Protein Bars
But, where do you get your protein? The universal question of non-vegans/vegetarians. I get plenty of protein from nuts, seeds, grains, veggies, of course. But I've been experimenting with hemp protein powder lately, and while I wouldn't consider it a "whole food" it seems to be much less processed than the regular isolated proteins, *cough* soy.
So here's a take on some awesome bars that I've tried at work, but can't afford to be spending my money on all of the time!
Chocolate Coffee Protein Bars
makes 12 bars
1 cup almond butter
1/2 cup of raw honey and agave, in any ratio you'd like
1 cup hemp protein powder (I used Bob's Red Mill)
1/4 cup unsweetened chocolate
1/3 cup cocoa powder
1/4 cup VERY strong coffee
1.) Put all of the ingredients in the food processor and mix well.
2.) Flatten mixture into a pan for desired thickness.
3.) Chill in fridge for about 20 minutes, and then cut into bars.
4.) Store in fridge.
I like to wrap mine individually in foil so that I can just grab them for a snack at school.
These are uber tasty, but very rich and satisfying. Enjoy!
 Pre-Packaging
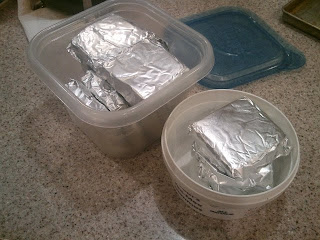 Individually wrapped!
So here's a take on some awesome bars that I've tried at work, but can't afford to be spending my money on all of the time!
Chocolate Coffee Protein Bars
makes 12 bars
1 cup almond butter
1/2 cup of raw honey and agave, in any ratio you'd like
1 cup hemp protein powder (I used Bob's Red Mill)
1/4 cup unsweetened chocolate
1/3 cup cocoa powder
1/4 cup VERY strong coffee
1.) Put all of the ingredients in the food processor and mix well.
2.) Flatten mixture into a pan for desired thickness.
3.) Chill in fridge for about 20 minutes, and then cut into bars.
4.) Store in fridge.
I like to wrap mine individually in foil so that I can just grab them for a snack at school.
These are uber tasty, but very rich and satisfying. Enjoy!
Pre-Packaging Individually wrapped!
January 14, 2011
Pumpkin Butter!
A friend's mom gave me a little jar of pumpkin butter, which was awesome. I reinvented the "butter and jelly on toast" combination with toasted Ezekiel bread, coconut butter, and pumpkin butter.
However the jar being little, it didn't last too long. The ingredients were pumpkin, sugar, and citric/ascorbic acid. I made it with agave and a little bit of maple syrup, which rounds out the simple sweet flavor. I would recommend using canned pumpkin for this recipe as opposed to home-baked pumpkin, because the canned pumpkin is so finely pureed. The batch that I made is definitely not as sweet as the store bought jar, but that's fine for my preference.
Homemade Pumpkin Butter
1 1/2 cups pureed pumpkin
6 tbls agave
2 tbls maple syrup
Whisk together, and enjoy. The desired sweetness level is of course, up to you. If you have a sweet tooth you may want to add more agave. If you don't, you may want to cut back, say to 4 tbls agave.

January 7, 2011
Kale Chips
Ah, fresh veggies. Ripe, in-season fruit. Long, warm days- Oh wait, it's winter. Everything is cold and dead. And the worst is yet to come. I'm a very optimistic person, can't you tell? Despite the cold, i'm still trying to get in the fruits and veggies that make me feel so good. Room temperature smoothies have been keeping me going through the school day, but these conspicuous green concoctions in translucent red nalgene bottles aren't quite enough. I like solid food sometimes too, you know?
January 1, 2011
Happy New Years Day!
Last night I made these gluten-free chocolate chip cookies from Gluten-Free Goddess, without the expresso. (It was 9 o'clock and I didn't feel like making a bit of coffee.) They were pretty awesome. I've made a fair amount of gluten free muffins/other various gluten free baked goods, but I am nowhere near getting the art down to a science. They weren't crazy sweet, and I liked them, so then I got my brother to try them, who also liked them, so I figured they were good enough to bring to my boyfriend's house. (His little sister has celiac disease.) When I was gone my brother fed some to his friends (who didn't know they were vegan or gluten free) and they thought they were really good. Woo hoo! Passing the ultimate test. So, if you were at all wondering about a good gluten free chocolate chip cookie recipe, hit up Karina's site. Actually pretty much everything I've made from her blog has been awesome, so you can't really go wrong.
Happy New Year!
Happy New Year!
Subscribe to:
Posts (Atom)